Files for Metal Pipeline
Managing Project Files/Packages
FabStation supports several common detailing and design software formats. This guide explains how to properly prepare and upload files when using Inventor, SolidWorks, and other supported formats.
For these workflows, IFC + KSS files are not required. FabStation can process native model files directly.
FabStation supports models exported from the following software:
SolidWorks
Inventor
Revit
AutoCAD
- And more…
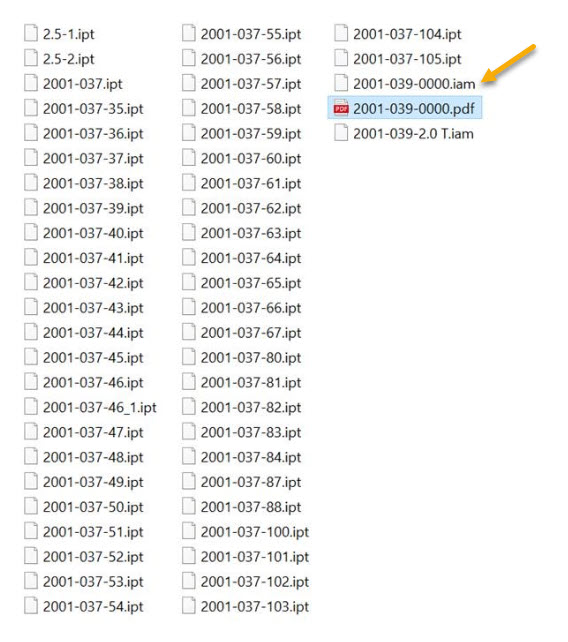
Inventor Files
For Inventor, FabStation requires the following file types:
- .IAM (Assembly files)
- .IPT (Part files)
- or as an alternative .STEP
Important notes:
- Each model must include the corresponding part files.
- .IPT files can be uploaded as standalone models.
- If a .IAM file is uploaded, all related .IPT files must also be included.
Super-assemblies are not supported. A super-assembly refers to an assembly that contains multiple assemblies inside one file.
Inventor STEP File Alternative
Inventor models can also be exported as STEP files.
Supported format: .step
Requirements:
- One STEP file per model.
- Do not combine multiple assemblies into a single STEP file.
PDF Files
Collect all the necessary files.
Place them in the same folder.
Compress the folder into a ZIP file.
Upload the ZIP file into your FabStation project.
For your first uploads, you can also send the files to the FabStation team for verification before uploading.
Example of a File Export:
SolidWorks Files
FabStation supports native SolidWorks files:
- .SLDASM (Assembly files)
- .SLDPRT (Part files)
- or as an alternative .STEP
Important notes:
- .SLDPRT files can be uploaded as standalone models.
- If you upload a .SLDASM assembly file, all referenced .SLDPRT files must also be included.
- The most important rule is to ensure that every .SLDPRT referenced in the .SLDASM assembly file is included in the upload package.
- Super-assemblies are not supported. A super-assembly refers to an assembly that contains multiple assemblies inside one file.
SolidWorks STEP File Alternative
Solid Work models can also be exported as STEP files.
Supported format: .step
Requirements:
- One STEP file per model.
- Do not combine multiple assemblies into a single STEP file.
PDF Files
Collect all the necessary files.
Place them in the same folder.
Compress the folder into a ZIP file.
Upload the ZIP file into your FabStation project.
For your first uploads, you can also send the files to the FabStation team for verification before uploading.
Other Files
For other modeling or detailing software not listed above, FabStation can also accept:
- Revit: .RVT, 3D .DWG, .SAT
- AutoCAD: .step files
- Single individual IFC files
- STEP files (.step)
If you are unsure which file types to export from your software, please contact: support@fabstation.com Our team will be able to guide you on the correct export format.
Package Upload Overview
To upload project data:
Step 1: Login into the FabStation webportal. Please use the same credentials for logging into the web portal as for logging into the app.
Step 2: Click on Projects>All Projects within the portal left menu.
Step 3: If this is your first time uploading a project file, click on Add Project in the top left corner.

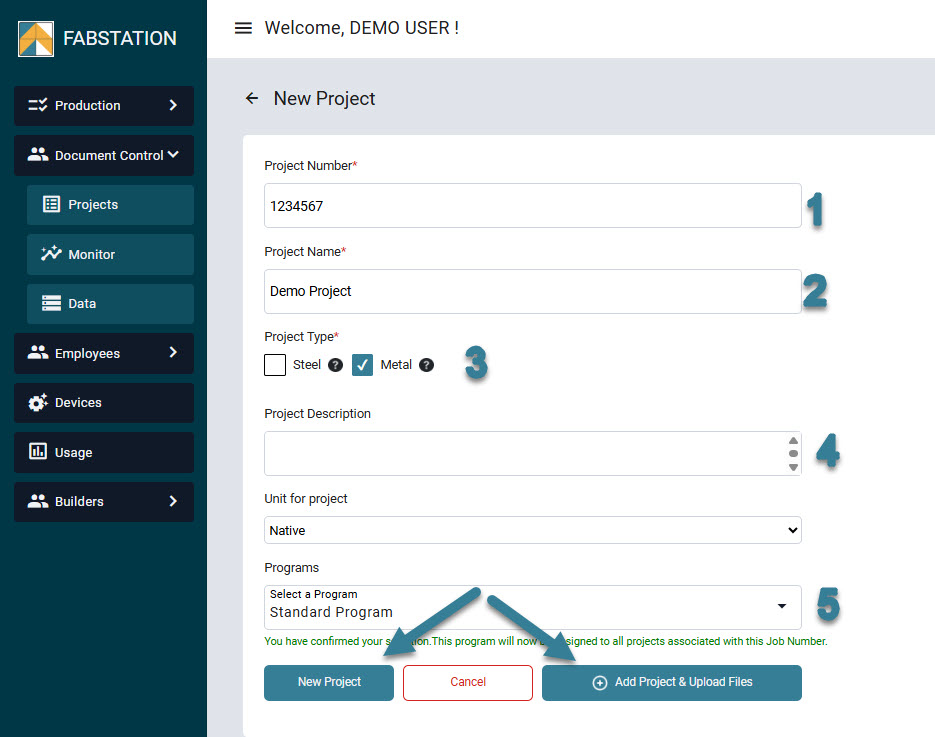
Step 4: Register your new project by entering:
1. Job Title (mandatory)
2. Project Name (mandatory)
3. Project Type: Choose Metal (mandatory). If Project Type is not available to you but you need access to Metal projects or you work with different file formats, please contact support@fabstation.com
Note: Click the ? icon next to each label to check which file types belong to each category.
Steel
Detailing Software: Tekla Structures, SDS2, Advanced Steel
File types: .kss, .ifc, .pdf
Metal
Detailing Software: Solid Works, Inventor, Revit, AutoCad
File types: .sldprt, .sldasm, .ipt, .iam, .rvt, .step, .stl, .sat, .pdf
Note: If you chose incorrect project type, you will be able to change it later, by editing the project.
4. Project Description
Once you’ve entered the information, the options Add Project and Add Project & Upload Files will be activated.
Select Add Project if you only want to register a new project or select Add Project & Upload Files to proceed with uploading your files.
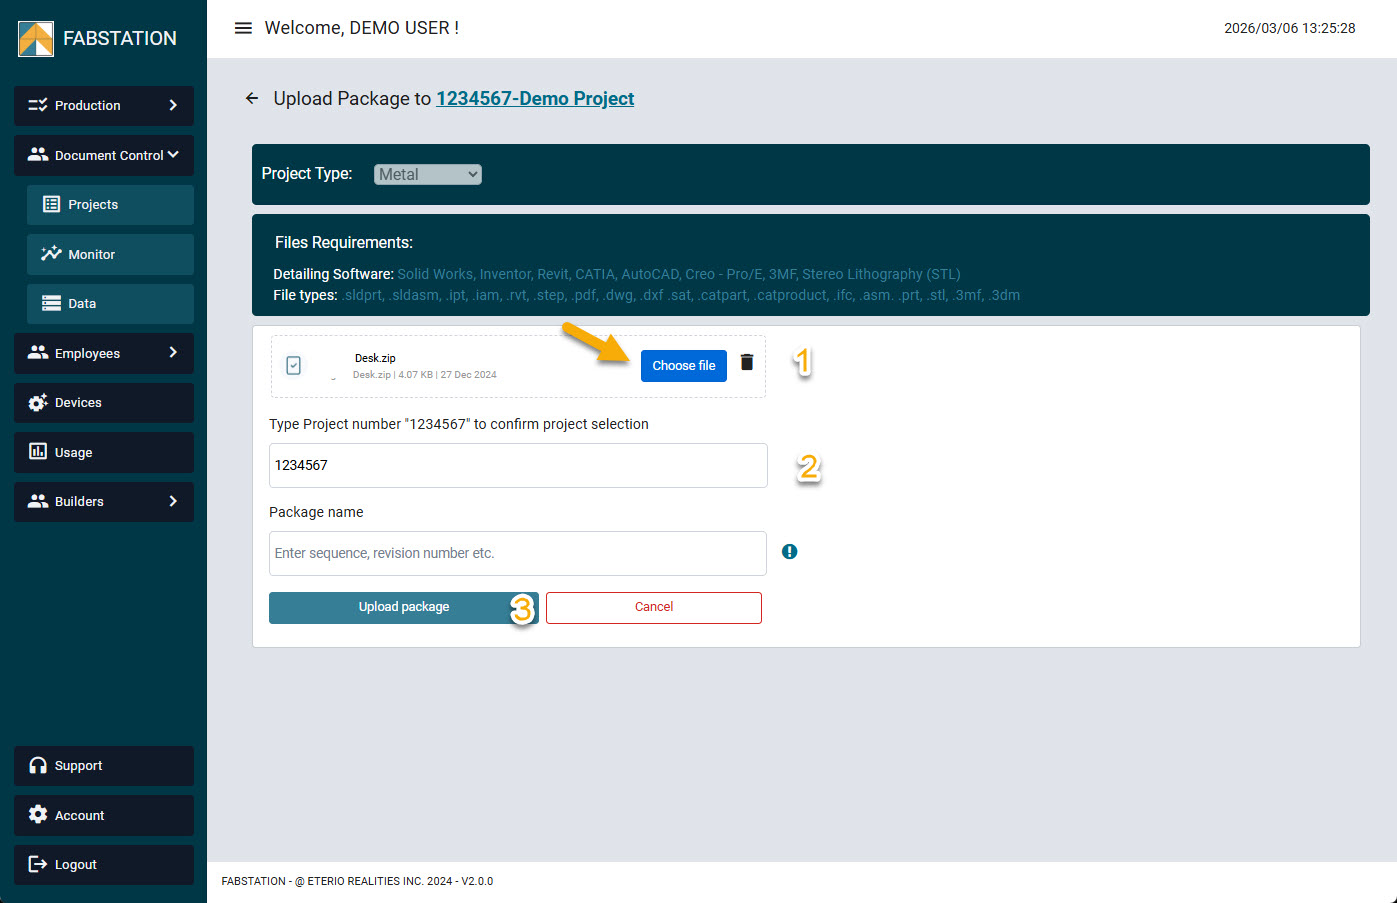
Step 5: Upload the ZIP project files.
Fill in the fields on the Project Upload page.
1. Upload Files – Drag and drop your ZIP file into the box or click “Choose File” to select it manually.
2. Confirm Project Name – Type the project name exactly as you see it to ensure the correct project is selected.
3. Add Package Name Details – Include revision number, revision date, and other details to track revision history.
Once all required fields are filled, the Upload Package button will be activated. Click it to start the upload.
Do not close your tab until the processing bar is complete. If the progress bar is not displayed, check that the Project Name is entered correctly and all fields are filled in.

Once uploaded, you will be automatically redirected to Monitor feature to track the project.
If there are any issues with the project, you will see yellow or red message describing the issue.