PowerFab: Set Up Project Files Integration
You can connect your project to PowerFab & Trimble to sync your project files.
To connect your project, you need to proceed with the following:Â
- Step 1: PowerFab Admin Set-Up (required once)
- Step 2: Enable PowerFab within FabStation (required once)
- Step 3: Connect your FabStation Project to Trimble (required once for every new project)
If you already completed Step 1, and connect your project to PowerFab & Trimble click here.
PowerFab connection is a paid feature. Please reach our to your CSM or support to check if you have this add-on.Â
Step 1: PowerFab Admin Set-Up
- This step will be done only once for the whole company.
- You have to be an Admin in PowerFab to complete it.Â
You will need to Create a FabStation user within PowerFab and grand it some permissions to acces the data required for integration. For that, please proceed with the following:Â
1. In the PowerFab application, open Administration from the File menu.
2. Go to the External Users tab.
3. Click on the New button to create an external user.
4. To fill the form, please use the following values:
- Username = Fabstation_<CompanyName>
(Note: < CompanyName > with be your organization name with no space and letters only. If multiple words are present, initials can be used in ALL CAPS.) - Group = Fabstation_Tekla
- First Name = First name of your preference
- Last name = Last name of your preference
6. You will see a popup to ask whether an email should be generated with the password.
 – If Yes is selected, a new email will be opened with the username and password.
–Â If No is selected, a password will appear in a pop-up.
In both cases (email or pop-up), a one-time password will be visible on the screen, as shown below. Please make sure to save it.Â
Within the next few steps you will be setting up FabStation User Permissions to make sure that the data is transferring properly.Â
7 Next, click on the Created User and then select the “Remote Permissions” button, as shown below.
8 In the Remote Permissions window, please:Â
8.1 Select “Allow Remote Login”
8.2 Click “All” button at the bottom, and make sure that “All” in Production Control Jobs is selected.Â
8.3 Uncheck all the Delete Permissions, such as
- Delete Drawing
- Delete Revision in DrawingsÂ
- Delete in Productionstatus
- Delete Load in Shipping Status.
8.4 Save Remove Permissions.
That’s it. As the user is set, you can proceed with connecting it to your FabStation Company account to enable integration.Â
Step 2: Enable PowerFab within FabStation
Please note while PowerFab integration is in BETA, this step is not available for users. You will need to contact FabStation Support if you would like us to enable PowerFab for you.Â
This step will be done only once for the whole company.Â
You need to be an Admin in FabStation to proceed with this step.Â
- Please login into FabStation WebPortal.Â
- Navigate to Account > Edit Company.
3. Scroll down to the bottom of the screen and click on the toggle next to PowerFab to enable it.Â
R4. Then add the user details that you got from PowerFab:
- FabStation User ID = PowerFab Username
- FabStation Password = Poassword automatically created in PowerFab.
- IP Address = Public IP of the server in which the Powerfab has been hosted (consult your IT department if you are not such what to use here)
5. Once that is done, click on “Connect user to PowerFab”.
The status next to PowerFab logo should change from Not Connected to Connected.
If you clicked on "Connect user to PowerFab" and the status is still "Not Connected" contact support. Before that, please make sure that your User ID, Password is IP were added correctly.
Once the PowerFab is Connected, please sroll to the bottom of the page and click on “Update Company Info” to dave the changes.
Step 3: Connect your FabStation Project to Trimble
You will need to do this step every time you 🔗 connect a new FabStation project to your PowerFab\Trimble project.Â
1. Configure your Trimble project.
1.1. Go to your Trimble account on the Web browser.
1.2. Open the project you want to connect.
1.3. Unless you are already within the Explorer, open it like this:
1.4. Select Team and click on “Invite people to project”:
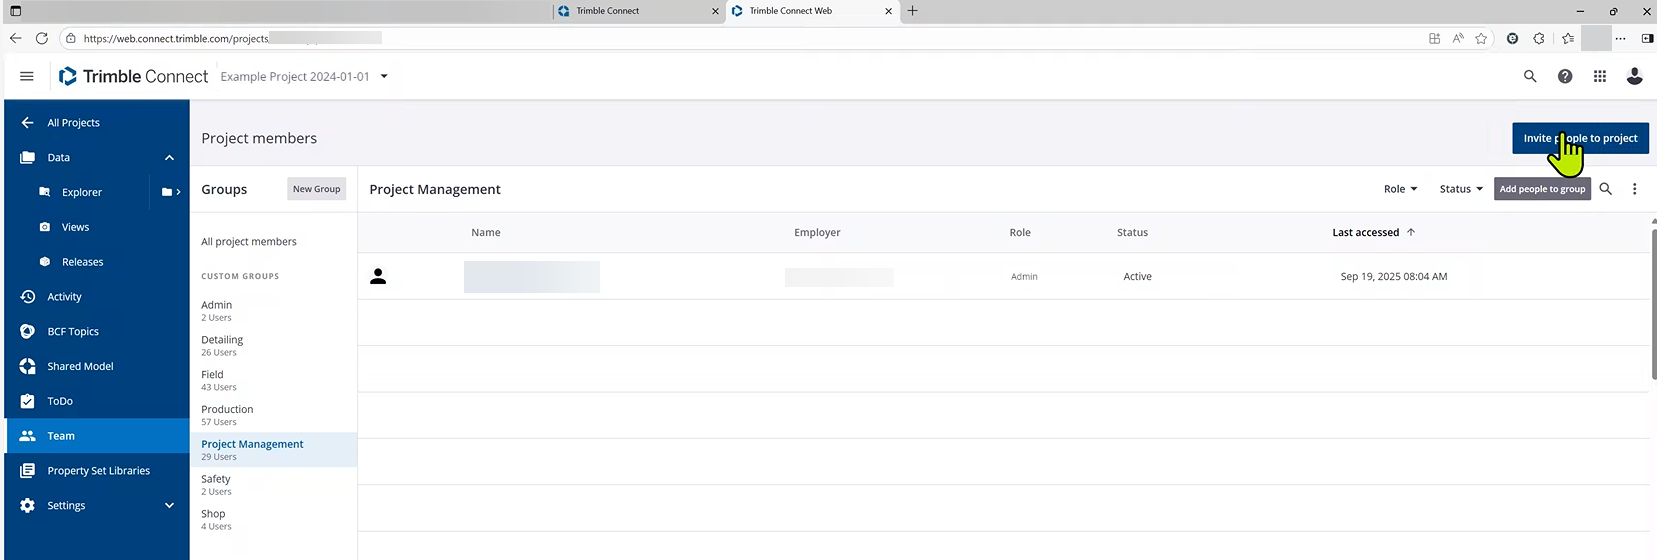
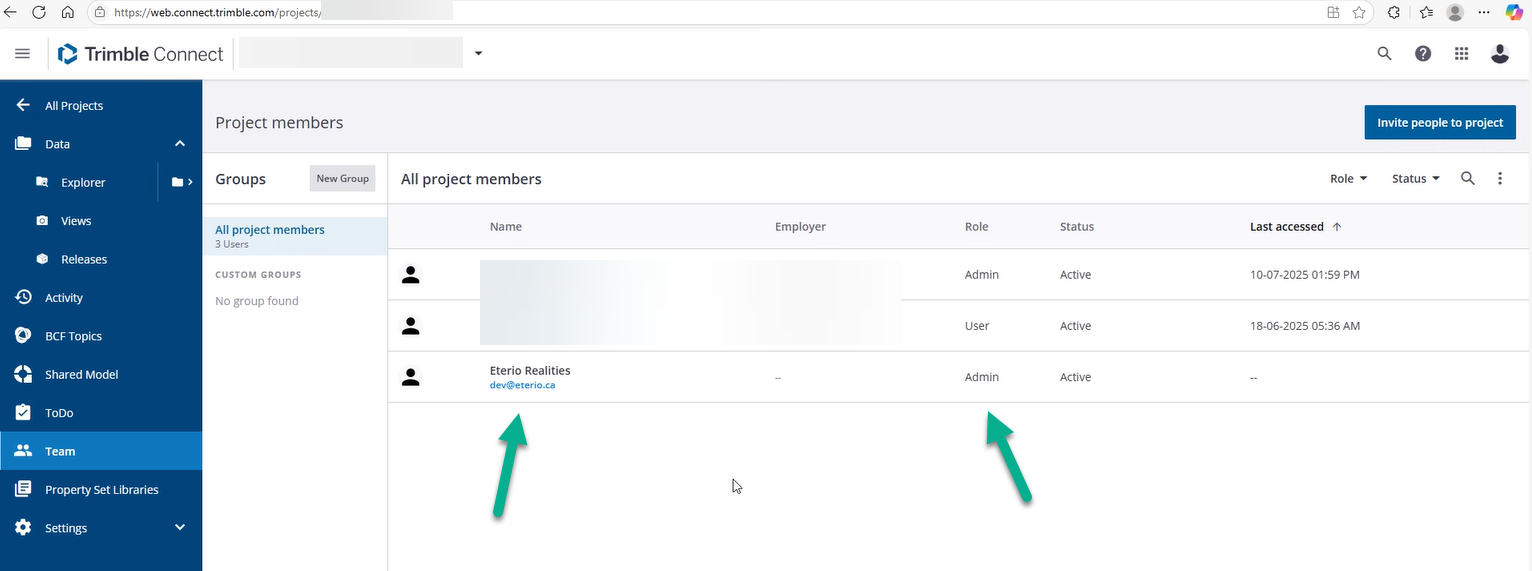
1.5. A pop-up will appear. There, add our addressÂ
in the people area, making sure to select Admin as the Role. If it’s added correctly, it will look like this:
Please note that you need to separately add this email to all projects that you would like to connect to FabStation.Â
1.6 Once this step is complete, navigate to Data > Explorer and create there a folder called FabStation:
- You need to upload all IFC that you want to see within FabStation into this FabStation folder, as this is the only folder we pick up the files from.
- No need for KSS, PDFs or other files, since we pick up this information directly from PowerFab. Â
Make sure that the IFC you upload to Trimble still have the same IFC settings (Assemblies: ON, Steel Fabrication View) as the IFC you normally upload to FabStation, as those settings are required for the IFC to function properly in FabStation.
1.7 As the final step, navigate to Settings > Project Details and copy the Trimble Project Name under Overview
2. Create and Sync your Project with FabStation.
2.1 Navigate to FabStation Webportal. If you do not have credentials for it, please ask your administrator to create them for you.Â
Click on Projects > All Project and “Add Project” project there:Â
2.2 Once a new project form opens, enable PowerFab and fill the details:Â
- It is required for the Project Number in FabStation to match the Job number in PowerFab\Trimble.
- It’s required for the “Trimble Project Name” in FabStation to match the “Name” of the project within Trimble.Â
2.3 Once the details are filled, you can connect Trimble Connect.
2.4 If all “Connect” labels are green, click on “New Project” and a project will be created.Â
If one of the “Connect” labels is still yellow, please double-check the project name and number in trimble. Please also note that it’s case-sensitive and additional spaced before the text, after the text or in the middle can also cause issues.Â
2.5 When the project is created, you will see it in All projects page among all other projects.Â
2.6 If you have already uploaded an IFC to FabStation folder in Trimble, click on “Sync” button.
- Enable the toggle on the right for PowerFab connection statuses to show up.Â
- It’s not possible to upload the files directly to the projects synced with PowerFab, that’s why instead of the “Upload files” button you have “Sync”.Â
- The IFC uploaded into PowerFab still need to be processed. You will be able to see their progress and history within Monitor page, like a regular package.Â
- We automatically sync the project data every 6 hours. If you would like the processing to start sooner, manually click on “Sync” button.Â
- Watch out for correct IFC export setting (Assemblies: ON, Steel Fabrication View), as otherwise the error occur with assemblies.Â